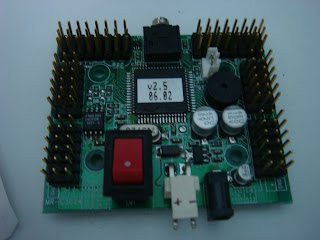
Wii Motion Plus

原文出處 http://randomhacksofboredom.blogspot.com/2009/06/wii-motion-plus-arduino-love.html
任天堂革命性的產品,
自己實作了一次,
這也算是窮人的陀螺儀吧..
//========= Arduino Code =========
#include <Wire.h>

byte data[6];    //six data bytes
int yaw, pitch, roll;  //three axes
int yaw0, pitch0, roll0;  //calibration zeroes
int startTag=0xDEAD;

void wmpOn(){
  Wire.beginTransmission(0x53);    //WM+ starts out deactivated at address 0x53
  Wire.send(0xfe);     //send 0x04 to address 0xFE to activate WM+
  Wire.send(0x04);
  Wire.endTransmission();    //WM+ jumps to address 0x52 and is now active
}

void wmpSendZero(){
  Wire.beginTransmission(0x52);    //now at address 0x52
  Wire.send(0x00);     //send zero to signal we want info
  Wire.endTransmission();
}

void calibrateZeroes(){
  for (int i=0;i<10;i++){
    wmpSendZero();
    Wire.requestFrom(0x52,6);
    for (int i=0;i<6;i++){
data[i]=Wire.receive();
    }
    yaw0+=(((data[3]>>2)<<8)+data[0])/10;  //average 10 readings for each zero
    pitch0+=(((data[4]>>2)<<8)+data[1])/10;
    roll0+=(((data[5]>>2)<<8)+data[2])/10;
  }
  /*Serial.print("Yaw0:");
  Serial.print(yaw0);
  Serial.print("  Pitch0:");
  Serial.print(pitch0);
  Serial.print("  Roll0:");
  Serial.println(roll0);*/
}

void receiveData(){
  wmpSendZero(); //send zero before each request (same as nunchuck)
  Wire.requestFrom(0x52,6);  //request the six bytes from the WM+
  for (int i=0;i<6;i++){
    data[i]=Wire.receive();
  }
  yaw=(((data[3]>>2)<<8)+data[0]);  //see http://wiibrew.org/wiki/Wiimote/Extension_Controllers#Wii_Motion_Plus
  pitch=(((data[4]>>2)<<8)+data[1]);    //for info on what each byte represents
  roll=(((data[5]>>2)<<8)+data[2]);
}

void setup(){
  Serial.begin(115200);
  //Serial.println("WM+ tester");
  Wire.begin();
  wmpOn(); //turn WM+ on
  calibrateZeroes();  //calibrate zeroes
  delay(1000);
}

void loop(){
  receiveData(); //receive data and calculate yaw pitch and roll
  Serial.write((unsigned byte*)&startTag, 2);  //see diagram on randomhacksofboredom.blogger.com
  Serial.write((unsigned byte*)&pitch0, 2);    //for info on which axis is which
  Serial.write((unsigned byte*)&yaw0, 2);
  Serial.write((unsigned byte*)&roll0, 2);
  Serial.write((unsigned byte*)&pitch, 2);
  Serial.write((unsigned byte*)&yaw, 2);
  Serial.write((unsigned byte*)&roll, 2);
  delay(10);
}
//================= End


//========= Processing Code =========
// 劃出波形

import processing.serial.*;

// Globals
int g_winW             = 820;   // Window Width
int g_winH             = 600;   // Window Height
boolean g_dumpToFile   = false;  // Dumps data to c:\\output.txt in a comma seperated format (easy to import into Excel)
boolean g_enableFilter = false;  // Enables simple filter to help smooth out data.

cDataArray pitch0    = new cDataArray(200);
cDataArray yaw0    = new cDataArray(200);
cDataArray roll0    = new cDataArray(200);
cDataArray pitch      = new cDataArray(200);
cDataArray yaw     = new cDataArray(200);
cDataArray roll     = new cDataArray(200);
cGraph g_graph         = new cGraph(10, 190, 800, 400);
Serial g_serial;
PFont  g_font;

void setup()
{
  size(g_winW, g_winH, P2D);

  println(Serial.list());
  g_serial = new Serial(this, "COM3", 115200, 'N', 8, 1.0);  //enter COM port of
  g_font = loadFont("AVGmdBU-30.vlw");                       //of arduino here
  textFont(g_font, 20);

  // This draws the graph key info
  strokeWeight(1.5);
  stroke(255, 0, 0);     line(20, 440, 35, 440);
  stroke(0, 255, 0);     line(20, 460, 35, 460);
  stroke(0, 0, 255);     line(20, 480, 35, 480);
  stroke(255, 0, 0);     line(20, 500, 35, 500);
  stroke(0, 255, 0);     line(20, 520, 35, 520);
  stroke(0, 0, 255);     line(20, 540, 35, 540);
  fill(0, 0, 0);
  text("pitch0", 40, 450);
  text("yaw0", 40, 470);
  text("roll0", 40, 490);
  text("pitch", 40, 510);
  text("yaw", 40, 530);
  text("roll", 40, 550);
  //text("current raw", 180, 430);
  //text("current deg/s", 320, 430);

  if (g_dumpToFile)
  {
    // This clears deletes the old file each time the app restarts
    byte[] tmpChars = {'\r', '\n'};
    saveBytes("c:\\output.txt", tmpChars);
  }
}

void draw()
{
  // We need to read in all the avilable data so graphing doesn't lag behind
  while (g_serial.available() >= 2*6+2)
  {
    processSerialData();
  }

  strokeWeight(1);
  fill(255, 255, 255);
  g_graph.drawGraphBox();

  strokeWeight(1.5);
  stroke(255, 0, 0);
  g_graph.drawLine(pitch0, 0, 16384);
  stroke(0, 255, 0);
  g_graph.drawLine(yaw0, 0, 16384);
  stroke(0, 0, 255);
  g_graph.drawLine(roll0, 0, 16384);
  stroke(255, 0, 0);
  g_graph.drawLine(pitch, 0, 16384);
  stroke(0, 255, 0);
  g_graph.drawLine(yaw, 0, 16384);
  stroke(0, 0, 255);
  g_graph.drawLine(roll, 0, 16384);
}

// This reads in one set of the data from the serial port
void processSerialData()
{
  int inByte = 0;
  int curMatchPos = 0;
  int[] intBuf = new int[2];

  intBuf[0] = 0xAD;
  intBuf[1] = 0xDE;

  while (g_serial.available() < 2); // Loop until we have enough bytes
  inByte = g_serial.read();

  // This while look looks for two bytes sent by the client 0xDEAD
  // This allows us to resync the server and client if they ever
  // loose sync.  In my testing I haven't seen them loose sync so
  // this could be removed if you need to, but it is a good way to
  // prevent catastrophic failure.
  while(curMatchPos < 2)
  {
    if (inByte == intBuf[curMatchPos])
    {
      ++curMatchPos;
     
      if (curMatchPos == 2)
        break;
   
      while (g_serial.available() < 2); // Loop until we have enough bytes
      inByte = g_serial.read();
    }
    else
    {
      if (curMatchPos == 0)
      {
        while (g_serial.available() < 2); // Loop until we have enough bytes
        inByte = g_serial.read();
      }
      else
      {
        curMatchPos = 0;
      }
    }
  }

  while (g_serial.available() < 2*6);  // Loop until we have a full set of data

  // This reads in one set of data
  {
    byte[] inBuf = new byte[2];
    int pitch0_cur, yaw0_cur, roll0_cur, pitch_cur, yaw_cur, roll_cur;

    g_serial.readBytes(inBuf);
    // Had to do some type conversion since Java doesn't support unsigned bytes
    pitch0_cur = ((int)(inBuf[1]&0xFF) << 8) + ((int)(inBuf[0]&0xFF) << 0);
    g_serial.readBytes(inBuf);
    yaw0_cur = ((int)(inBuf[1]&0xFF) << 8) + ((int)(inBuf[0]&0xFF) << 0);
    g_serial.readBytes(inBuf);
    roll0_cur = ((int)(inBuf[1]&0xFF) << 8) + ((int)(inBuf[0]&0xFF) << 0);
    g_serial.readBytes(inBuf);
    pitch_cur   = ((int)(inBuf[1]&0xFF) << 8) + ((int)(inBuf[0]&0xFF) << 0);
    g_serial.readBytes(inBuf);
    yaw_cur  = ((int)(inBuf[1]&0xFF) << 8) + ((int)(inBuf[0]&0xFF) << 0);
    g_serial.readBytes(inBuf);
    roll_cur  = ((int)(inBuf[1]&0xFF) << 8) + ((int)(inBuf[0]&0xFF) << 0);
   
    pitch0.addVal(pitch0_cur);
    yaw0.addVal(yaw0_cur);
    roll0.addVal(roll0_cur);
    pitch.addVal(pitch_cur);
    yaw.addVal(yaw_cur);
    roll.addVal(roll_cur);

    if (g_dumpToFile)  // Dump data to a file if needed
    {
      String tempStr;
      tempStr = pitch0_cur + "," + yaw0_cur + "," + roll0_cur + "," + pitch_cur + "," + yaw_cur + "," + roll_cur + "\r\n";
      FileWriter file;

      try 
      { 
        file = new FileWriter("c:\\output.txt", true); //bool tells to append
        file.write(tempStr, 0, tempStr.length()); //(string, start char, end char)
        file.close();
      } 
      catch(Exception e) 
      { 
        println("Error: Can't open file!");
      }
    }

    /*
    print(pitch0_cur);  print(" ");   print(yaw0_cur);   print(" ");    print(roll0_cur);     print(" ");
    print(pitch_cur);    print(" ");   print(yaw_cur);    print(" ");    println(roll_cur);
    */
  }
}

// This class helps mangage the arrays of data I need to keep around for graphing.
class cDataArray
{
  float[] m_data;
  int m_maxSize;
  int m_startIndex = 0;
  int m_endIndex = 0;
  int m_curSize;

  cDataArray(int maxSize)
  {
    m_maxSize = maxSize;
    m_data = new float[maxSize];
  }

  void addVal(float val)
  {
   
    if (g_enableFilter && (m_curSize != 0))
    {
      int indx;
     
      if (m_endIndex == 0)
        indx = m_maxSize-1;
      else
        indx = m_endIndex - 1;
     
      m_data[m_endIndex] = getVal(indx)*.5 + val*.5;
    }
    else
    {
      m_data[m_endIndex] = val;
    }
   
    m_endIndex = (m_endIndex+1)%m_maxSize;
    if (m_curSize == m_maxSize)
    {
      m_startIndex = (m_startIndex+1)%m_maxSize;
    }
    else
    {
      m_curSize++;
    }
  }

  float getVal(int index)
  {
    return m_data[(m_startIndex+index)%m_maxSize];
  }

  int getCurSize()
  {
    return m_curSize;
  }

  int getMaxSize()
  {
    return m_maxSize;
  }
}

// This class takes the data and helps graph it
class cGraph
{
  float m_gWidth, m_gHeight;
  float m_gLeft, m_gBottom, m_gRight, m_gTop;

  cGraph(float x, float y, float w, float h)
  {
    m_gWidth     = w;
    m_gHeight    = h;
    m_gLeft      = x;
    m_gBottom    = g_winH - y;
    m_gRight     = x + w;
    m_gTop       = g_winH - y - h;
  }

  void drawGraphBox()
  {
    stroke(0, 0, 0);
    rectMode(CORNERS);
    rect(m_gLeft, m_gBottom, m_gRight, m_gTop);
  }

  void drawLine(cDataArray data, float minRange, float maxRange)
  {
    float graphMultX = m_gWidth/data.getMaxSize();
    float graphMultY = m_gHeight/(maxRange-minRange);
   
    for(int i=0; i<data.getCurSize()-1; ++i)
    {
      float x0 = i*graphMultX+m_gLeft;
      float y0 = m_gBottom-((data.getVal(i)-minRange)*graphMultY);
      float x1 = (i+1)*graphMultX+m_gLeft;
      float y1 = m_gBottom-((data.getVal(i+1)-minRange)*graphMultY);
      line(x0, y0, x1, y1);
    }
  }
}
//================= End

Roboard RB-100 computer control with Hitec Robonova - First walk (Prototype I)

停擺了幾年.. 終於完成了第一步了..
使用 Hitec Robonova 機構
和 Hitec HSR-8498HB Servo
換上 Robaord Rb-100 控制板..

首先須要先準備一些東東..
A. 線材 (杜邦線 )


光華商場買來只有一頭有做好杜邦頭, 另外一邊有吃錫,
所以需要DIY接頭..


因為是 Prototype 所以接頭都用活動的.
需要準備 1 pin, 2pin ..


好像在做家庭手工...
因為要準備 16 Servo x 3 ( 正極 / 負極 / 信號 )
總共  48 條線 ...
因為要外接電源, 所以另外做一個轉版,
工具需要剝線鉗 + 端子鉗.


48條線做好出入杜邦頭後..逐一用電表測試導通與否..


寫了一個小介面程式控制,
先暫時調了2個動作... 站立 + 走一步..

因為才剛剛開始...
所以都還沒有加入任何感測元件..等
動起來搖搖晃晃的, 接下來將陸續實作這部分了~

影片:


RGB Led 1W

接線圖


關鍵一:
Arduino Mini
腳位接到數位IO腳 3, 5, 6, 9, 10, 11 才能做輸出.. !!!
關鍵二:
此 RGB LED circuit 標示錯誤 - 負極..實際上要接 +正極,
R/G/B 接 Digital Pin, 共4線.. 不須接地線.

影片:


程式碼:
int R_ledPin = 9;

int G_ledPin = 10;

int B_ledPin = 11;

int ledPin = 13;


// val 255 = off

int R_val=254;

int G_val=254; 

int B_val=254;


void setup()

{ 

pinMode(ledPin, OUTPUT);


pinMode( R_ledPin, OUTPUT); 

pinMode( G_ledPin, OUTPUT); 

pinMode( B_ledPin, OUTPUT); 


Serial.begin ( 9600 );


analogWrite ( R_ledPin, R_val );

analogWrite ( G_ledPin, G_val );

analogWrite ( B_ledPin, B_val ); 


delay ( 1000 );

}

int dir=0;

int color = 0;

int offset = 5;

void loop() 

{

digitalWrite(ledPin, HIGH); 


switch ( color )

{

case 0: analogWrite ( R_ledPin, R_val ); break;

case 1: analogWrite ( G_ledPin, R_val ); break;

case 2: analogWrite ( B_ledPin, R_val ); break;

}


if ( dir == 0 )

{

if ( R_val - offset > 0 )

{

R_val -= offset;

}

else 

{

R_val = 0;

dir = 1; 

}

}


if ( dir == 1 )

{

if ( R_val + offset < 255 )

{ 

R_val += offset;

}

else 

{

R_val = 254;

dir = 0;


if ( color + 1 < 3 ) color ++;

else color = 0;

} 

}

//delay ( 300 );


clearLCD (); // 清除 LCD 畫面


// 輸出數值到 LCD

Serial.print ( "R= ");

Serial.print ( R_val, DEC );

Serial.print ( "\n");
}

// ===== clear the LCD =====

void clearLCD()
{
Serial.print(12, BYTE);

}

計數器

試試這家的計數器...
http://www.pax.com

智慧手機 Android 平台

Adnroid 開發環境軟體安裝步驟

1.安裝 Android SDK and AVD Manager
檔案 android-sdk_r06-windows.zip


2.安裝 Java SDK
下載網址  http://www.oracle.com/technetwork/java/javase/downloads/index.html
檔案 jdk-6u21-windows-i586.exe


3.安裝 Eclipse
下載網址 http://www.eclipse.org/downloads/
檔案 eclipse-java-helios-win32.zip
A. 執行 Eclipse -> Help -> install new software ->
     Work with  "http://dl-ssl.google.com/android/eclipse/site.xml" Add
B. 執行 Eclipse -> Windows->Preferences-> SDK Location: (選擇步驟一的路徑)

Roboard RB-100 A/D Channel 的應用...

紅外線測距 Sharp GP2Y0A02 成功嚕~

從 I2C 拉出 +5V
然後接上..
A/D Pin 1 (信號)
A/D Pin 2 (接地)
換算電壓 -> 距離, 程式碼如下:

spi_Initialize(SPICLK_21400KHZ );
float volts;
float cm=0;
int channel = 0;
float VOLTS_PER_UNIT = 0.0049F;        // (.0049 for 10 bit A-D)
int val = ad7918_ReadChannel ( channel, //channel = 0 ~ 7
                        AD7918MODE_RANGE_2VREF, AD7918MODE_CODING_1023);
volts = (float)val * VOLTS_PER_UNIT;
cm = 60.495 * pow ( (float)volts, (float)-1.1904);

Part 4 - 控制 servo 轉動的速度, 而且要轉動的 Smooth

執行後是,左右轉到底再反向.


原始碼如下:
#include <Servo.h> 
Servo myservo;  // create servo object to control a servo 
void setup() 
{ 
  Serial.begin(9600);
  myservo.attach(9); 
} 
int pulse =2450;
int dir=1;
int offset=1;
void loop() 
{
  myservo.writeMicroseconds( pulse );
  if ( pulse + offset >= 2450 ) dir = -1;
  else if ( pulse - offset <= 600 ) dir = 1;
  
  pulse += ( offset * dir);

  Serial.println ( pulse, DEC );
}

傳說中的夢幻逸品!


Bose 的主動降噪式耳機..
由於辦公室的噪音/空調聲音都很大聲,
就買一個傳說中的夢幻逸品..試試主動降噪式耳機,
剛買回家的時候聲音很悶.. 女高音都變男生..@@
後來一直開著約 30小時以後,
高音開始清楚, 低音也還不錯,
這種隔絕外界噪音, 能夠更清楚聽見以前歌曲中沒注意到的樂器聲...
不錯的科技產品..讚~

課目: Robonova 機器人換心手術.

課目: Robonova 機器人換心手術.
說明: 控制板: Roboard RB-100.

控制板作業系統: Windows XP Embedded(開機超快~)

軟體開發環境:
Windows 7
Visual Studio 2008
//============
先列出 Demo 程式 RoboRC.exe 中的命令/說明列表..

Parameters

-CH xxxxxxxx or --channels xxxxxxxx:
    Specify the PWM channels to use
-t xxxx or --time xxxx:
    Specify the time for realtime frame capture,
    frame replay, and demo play
-SV [Generic, KONDO, HiTEC] or --servo [Generic, KONDO, HiTEC]:
    Specify servo motors
-OW or --overwrite:
    Always overwrite the file of storing captured frames
-NM or --nomessage:
    Not display messages when capturing or replaying frames,
    being useful to speed up CAPTURE_RT and REPLAYS_RT modes

//============
Usage examples
RoBoRC.exe CAPTURE(or 0) 0000.txt -CH 000000ff:
//Capture a single frame of servo positions on channels 0~7.
//The frame is saved to 0000.txt.

RoBoRC.exe REPLAY(or 1) 0000.txt -CH 000000ff -t 800:
//Replay the single frame of servo positions in 0000.txt.
//The frame is replayed on channels 0~7 by 800ms.

RoBoRC.exe CAPTURES(or 00) 0000.frm -CH 0000ffff:
//Capture multiple frames of servo positions on channels 0~15.
//The frames are saved to 0000.frm.

RoBoRC.exe REPLAYS(or 11) 0000.frm -CH 0000ffff -t 500:
//Replay the multiple frames of servo positions in 0000.frm.
//Each frame is replayed on channels 0~15 by 500ms.
//===========
RoBoRC.exe CAPTURES_RT(or 000) 0000.frm -CH 0000ffff -t 300:
//Capture in realtime multiple frames of
//servo positions on channels 0~15 per 300ms.
//The frames are saved to 0000.frm.

RoBoRC.exe REPLAYS_RT(or 111) 0000.frm -CH 0000ffff -t 100:
//Replay in realtime the multiple frames of
//servo positions in 0000.frm.
//Each frame is replayed on channels 0~15 by 100ms.

RoBoRC.exe demo_directory -t 10000:
//Load the Demo in demo_directory and
//set the action idle time to 10000ms (which means that
//the servo power will be turned off if the robot
//idles over 10s after finishing an action).
//===========
上面的說明一定要仔細閱讀..
在 Hitec 8498HB Servo 中的參數使用範例:
RoboRC CAPTURES 0000.frm -CH 0000ffff -SV -OW
測試 feedback position 功能正常..
影片:影片: ( 1080p HD 高清版 )


修改原廠程式RoboRC 中的一些小 bug
1. Initializing Servo 時, 顯示種類名稱錯誤.
2. 捕捉動作時的 servo 顯示種類名稱錯誤.
3. servo_idx 內定值 = 2 (這個一定要修改, Hitec 8498HB 才能正常 play frames ).
在 RoboRC.cpp Line 39.
以上~ 原廠附的 LIB, Demo 程式都已經測試無誤了,
請安心服用..

移植心臟照片, 由於忠實呈現移植畫面,
可能過於血腥, 請斟酌收看,
尤其未成年者,須由師長陪同.


原廠的控制板 MR-C3024,  24 Servos control

支解中 ...

特寫一張..控制板 MR-C3024

換上 Roboard RB-100 單板電腦.

特寫一張..

俯視照

換心完成~

疊疊樂一張... 機器人坐在 Roomba 電池和布丁桶上..適應新的心臟!

//=======================
補上一個 Roboard 程式開發好物
USB 傳輸線 PC to PC/Mac
很方便好用.. 提升很多效率..
黃色小屋買的, 幾百元而已.
真的不用安裝任何驅動和程式.
程式都已經寫在 ROM裡面了..
直接插上.. 開發機 (Win7) <---> Roboard (XPE)

瀏覽人數計數器

試用免費的
http://www.histats.com/
不知道效果如何... 先嵌入計數程式碼..再觀察看看~

室內裝潢 DIY - ( Part - 3 ) 層板 (隱藏式支架)

好看的層板...但是無法載重..
當展示架真的很美..
施工過程.. 看圖嚕~


廠商很貼心的附上基準紙,
省去了量來量去, 可能產生誤差的麻煩...


關鍵就在背面...


施工前~ 牆壁非常的冷清.. 家徒四壁 @@


雷射水平式一定要用到的... 不然裝歪了~就鼠了


基準線貼好以後再用 雷射水平檢查..


再確認一次...一定要平~


鑽孔了~ 以前都是用 普通電鑽.. 鑽一個洞要 10分鐘 @@


鎖好支架, 假組合一下~


組合好以後,再檢查水平~


一定要很平阿... 不然要改很麻煩了..


完工嚕~ 放上裝飾品.. ^^


不夠華麗~ 再放一個..


再來一張~


收工~
使用工具也要介紹一下.. 真的很好用..
鑽一個水泥孔塞壁虎.. 不用 30秒...


還送一包鑽頭... 一堆螺絲,壁虎..救甘心的啦~


收納盒~

室內裝潢 DIY - ( Part - 1 ) 油漆

記得以前買第一間房子時..年紀輕,


對 DIY 裝潢...沒興趣也沒時間,

所以都給設計公司處理...

這次是第二次買新房子,

為了有更大的參與感,

能自己設計, 自己DIY的就全部扛下來了..

還記得交屋後... 每天下班就到新家做一點,

假日也做一些..

就這樣一點一滴累積... 大約完成60%就搬進來住了..

雖然和房價比起來..裝潢油漆都是小錢..

但是~ 奇摩仔 差粉大..

DIY 才是王道阿~

顏色是老婆/女兒設計的.. 我只是油漆工,

看圖吧~
天花板太複雜, 我還不會 DIY..
先從簡單的開始吧..
客廳 / 走廊 / 廚房 油漆開始~


餐廳 


施工中~


  完工嚕~


書房油漆..


  由於是使用電腦調色機的油漆,


所以顏色可以調出各式各樣,

我和老婆女兒也都選了一些比較鮮豔大膽的顏色(和以前比較之下)

不像以前可以選的沒幾種..

科技真是進步阿~


插花報導一下..


客廳落地玻璃的門簾,

布料是老婆到永樂市場選布的..


  開不同光線的燈,氣氛就不一樣了~


淋浴間的層架~ ~ (只是鑽了2個洞,打壁虎 @@)


室內裝潢 DIY - ( Part - 2 ) 玄關地板

新家住了大約 9個月,
一直都想 DIY 一些裝潢,
終於等到了今年過年放了10天假期,
原先規劃了一堆項目都沒進行..
反而先進行了門廳地板的升級...
下列就是進行的過程..

材料是鋼琴烤漆拍立扣系列 - 胡桃色
規格:14*127.5*808mm
數量: 一包 16片.

先拆包裝全部放到地板上..
覺得和大門, 置物櫃門, 鞋櫃玻璃門,
顏色非常的搭 ^^
本來想要如何安排拼接的花紋..
後來還是選擇最傳統的,
畢竟是我的第一次 @@

施工前~


裁切好了.. 先假組裝確認長度都沒問題..

 拼接好了, 剩下了一疊多出來的木板...
可能會拼到牆壁的裝飾吧 ^^


其實組裝並不難, 因為工廠做出來的木板,
接縫溝槽密合度非常好,
用 45度角崁入, 壓下去的密實度我非常喜歡~
整個組裝過程, 最麻煩的是 "收邊"..
還沒收邊的時候很醜~


左邊還沒收邊的時候..


先放上 收邊條 量長度..

 轉折處很麻煩...沒收邊特寫一下...很醜~


我這裡用了 45度的拼接工法..線沒有平行.. 真丟臉~


特寫一下轉角處的收邊..


左邊在收的時候就懶了...直接 90度拼接...
不仔細看也還可以啦~


最後裝上門檔. ( 哈哈~ 拍到鏡子裡面的我 @@ )


完工嚕~ 我的家人也都很喜歡..
第一次的地板DIY 也算是成功啦~
切割工具一定要介紹一下..
簡易型切割台 ( 施工中現場很亂 @@ )
線鋸機 轉平台式切割機套件..
再一張..

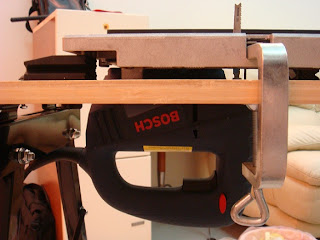
線鋸機 倒裝就變成桌上型切割台.. 我個人很喜歡~


以上~ 個人 DIY 真的很有趣..
您也可以試試喔..

網路上大家對於 線鋸機變桌上型切割台很有興趣,
下列貼上一些資訊..

那個好物名字叫 "博世線鋸桌" 型號 BOSCH MT 300 WP


Made in Switzerland


多少錢我已經忘了 = = ( 買過就忘了 )

我是在台北市環河南路,

整條街在賣五金/氣動工具那裏..

一家一家的問, 一家一家的找..

已經忘了在環河南路幾段找到的~ Sorry ~

因為當時網路怎麼查,都沒有人賣,

只有 官網有介紹...


線鋸機 GST 65 我個人DIY是夠用了,

如果切比較厚,或是硬的話,

木頭送的速度放慢就好了..


先看包裝盒的說明吧..因為已經放了超過6年了..

所以很髒~ 多包涵了..


平台式切圓的, 移動木板一定比移動 線鋸機來的精準和輕鬆..


直線導板非常順手..


可以方便的切出斜度..


板子的尺寸..


適用安裝的型號...


安裝用的夾具.. 裝起來非常緊, 切割時也不會有間隙..很穩~

附贈配備...平行導尺, 斜度導尺...